So I logged into WordPress this morning in anticipation of an upcoming event realizing I have not updated my business card. Holy smokes, it has been a while. I have updated the gallery with the latest creations -including my own wedding cake. Nothing like adding a little more to an already full plate. Either way, I will most likely be migrating to a new site in the near future. For all of you I had a chance to meet at the Baby Love Event, please take a look around. I hope you find something that sparks your interest! With warmest wishes – Mary
Azeeza Turns 1
Azeeza has turned one! Richie’s cousin, Carl, held a huge first birthday party for his daughter, Azeeza.
We had a lovely afternoon. Food & friends. A few drinks! Wonderful!

Double Digit Birthday & The WWE
Hello Birdies!
Cameron, my nephew, has turned 10. No longer a single digit for his cakes and on his way to becoming a man. He has grown so much in these past few years and it has been a joy to see him progress as he has. My nephew is a phenomenal young man – he does well in school, is polite, caring, and doesn’t really cause any trouble. He is a little shy however, whereas his sisters are a whirling dervish of activity and constant questions. When it came time to make his special Double Digit birthday cake, his answer to “What would you like for your cake?” was a very nonchalant “I don’t know.”. Alright…to the aforementioned dervish – “What does Cameron want for his birthday cake?”. Their response? “Wrestling.”
I had originally planned on a Mario Brothers cake but once WWE was mentioned, Mario went out the window. Alas, I shall have to wait for the Mario Brothers to make an appearance in cake but I am sure it will happen eventually. I do look forward to it.
Cameron is a vanilla kind of kid. He doesn’t really love chocolate or peanut butter or fruit flavors. I opted for a vanilla cake from Sweetopolita’s site (Recipe Here) and filled it with a Nutella frosting of my own design (recipe to follow) and butter brickle bits for crunch. I covered it in a classic vanilla butter cream. The recipe calls for 4 8″ rounds but I went with 2 10″ rounds and it worked perfectly.
Since I do not have any square pans, I worked out a pattern to cut the rounds to a rectangle. Make your measurements – Length and width. I use a clear plastic 18″ ruler I got from Staples. It has metric and US measurements and I use it more than I care to admit. Cut the long side of the rectangle. Save the scrap piece of cake and line it up with the other side. Cut using scrap as a guide. Now you have 2 matching sides. Cut the top, save the scrap and use it to cut the last side. Now place this rectangle on top of your second round and cut to match. Voila – matching rectangles. Save your scraps for cake balls or snacks.
Fill and frost then chill. Meanwhile, make all your gum paste accents so they have time to dry. Put them on a parchment covered pan in the oven with the light on. It really does speed up the drying process. Color your fondant folks. Let it rest so you can check the color. I made a mistake here and did not let it rest and it came out darker than I wanted really. The top in particular. A lesson learned.


This cake was the first time I ever paneled using fondant. It was a practice in patience and measuring skills. That ruler came in very, very handy on multiple occasions. I also did a double layer of fondant as well – again a first. I try to use a new technique every time I make a cake. One of these days I will make the Cake of All Cakes and include every technique I know. It shall be glorious! Until then I will keep practicing, updating, and trying new things. I hope you all come along and learn with me!
See you next time!
Nutella Filling
1/2 cup Nutella
2 tablespoons melted butter
pinch salt
3/4 to 1 cup powdered sugar (less or more depending on the consistency you want)
Mix all ingredients in a small bowl. It will look very strange at first and like it is separated. Just keep stirring. It will come together. Promise.
I did not try to use this as a frosting, only a filling. I make no guarantees on how it would work as a frosting…
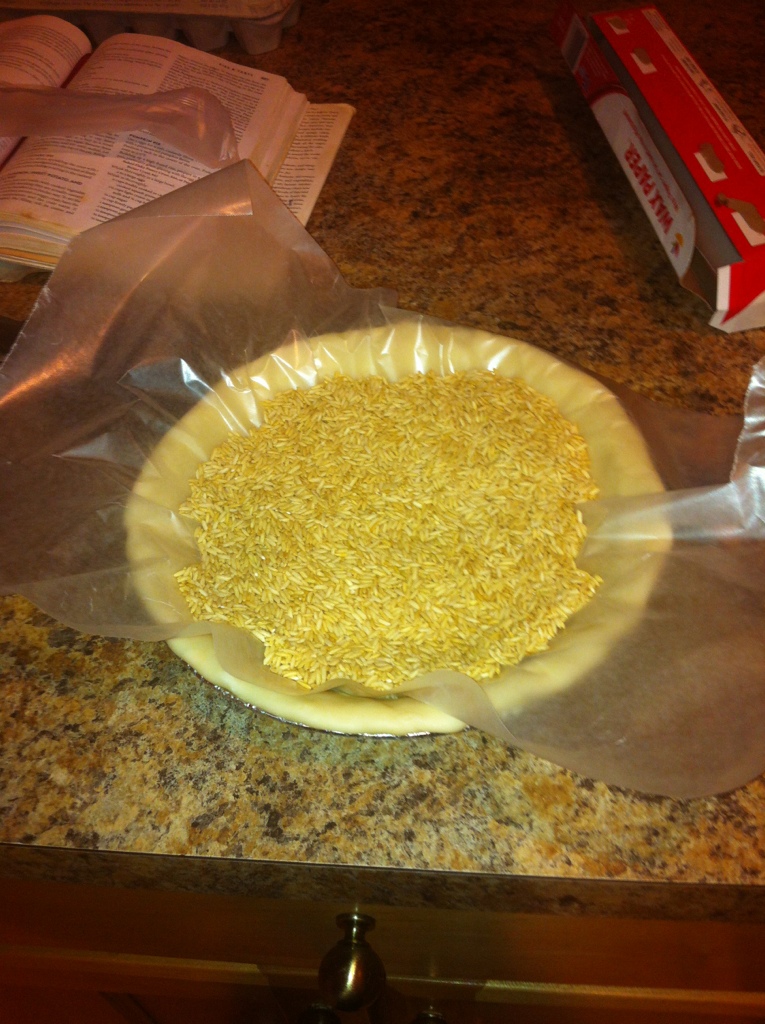
Blind baking a pie crust
Developments and Menu Planning – And Oh Yeah, Coconut Custard Pie!
Hello Birdies!
The past few days have been spent working on a comprehensive menu to show case all our different offerings. It is a labor of love. I need a few more days to get it completed but let me tell you, I am excited!
Meanwhile, the business cards have debuted to great feedback. I even earned a pie order! I will be delivering a coconut custard pie this morning for a great friend and colleague. This pie is what I love about old cookbooks. Everything is wholesome and from scratch. A simple presentation with spectacular results with nothing but sugar, eggs, milk, coconut and vanilla. A thing of beauty really. The texture is glorious and the flavor perfect. I hope they enjoy it as much as I do!
We have some baking tips and tricks for you today. If you are just starting out they will save you from certain disaster. The pie shell is blind baked – pre-cooked, cooled, then filled with the custard and baked again. This process prevents a soggy crust. I coat the baked shell with an egg wash prior to the filling being added for a little extra security. I use a piece of parchment (one of the best baking tools around) and fill it with rice to weigh the dough down. It would puff right out of shape without the weights. Make sure you liberally prick the dough with a fork before adding the weights – it allows steam to escape the dough while it bakes. This pie bakes at a lower temperature than a cake so no pie ring or tin foil strips are needed to protect the crust. Custard based pies generally cook at these lower temperatures to help keep the filling from setting too quickly at the edges and remaining raw in the middle. I like to preheat the oven a good 20 minutes before baking. When you open the oven door, you can lose up to a 100 degrees (or so I have heard). I just feel like having a good long preheat lets the oven recover quickly from the lost heat when the door opens.
But before you even open that oven door, make sure you are prepared to move the pie. I was working on a test recipe one day and made a big boo-boo. I filled my pie. I had set a large sheet pan next to the stove. I realized I now had to move my full, liquid filled pie onto that sheet pan. I covered the top of my stove with filling, lost a quarter of the filling in the process and turned the edges of the pie into a 1st grade art project. Transferring a pie shell filled with liquid onto another pan without spilling it is next to impossible. Thankfully, I have learned my lesson. Do not go down that road – it is filled with cuss words and frustration.
Now that your pie is in the oven, let it cook. Leave it alone for 25 minutes. Wash your dishes, have a glass of wine. Walk the dog. Now, check it. Gently bump the baking sheet. Does the middle of the pie jiggle a little still? If yes, pull that beauty out, it is done. If whole filling still jiggles, close the door and walk away for 3 minutes. Check it again. Do the jiggle test. Repeat until you are happy with the jiggle.
Let it cool to room temperature on a wire baking rack. Serve with whipped cream or chocolate sauce or bananas or grilled pineapple. Or whatever floats your fancy! Keep it refrigerated but warm to room temperature before serving.
Ryann
Hello Birdies!
Here is the first official post! I’m so excited I can barely contain myself!
This was a cake I made for a dear friend a few months ago. She gave me just about full creative control and allowed me to design it however I saw fit. Her dad was turning 75 and she wanted a golf themed cake. Here is what I came up with.

This cake was a chocolate cake. A luscious, rich, moist and delightful chocolate cake. A chocolate pound cake. I shall include a recipe below for all you lovelies who would like to give it a try – please keep in mind – this recipe makes a massive amount of cake. Invite your friends. You will need them.
I filled it with a raspberry sauce and covered it in a thin coat of classic buttercream. You can fill and coat this cake in whatever your heart desires. I also have used this cake with cherry and toasted almond buttercreams – quite the combination. We shall discuss those recipes another time…
I loved this cake on so many levels – the overall design, the flavors, the little details. I just loved it. Still do as a matter of fact! I made the strips of grass from green gum paste and cut them with a pizza cutter. The argyle was made with a template and a ruler and that same trusty pizza cutter. Love that thing. I crushed up some graham crackers for the sand traps and used green buttercream for the grass. The clubs are gum paste as well as the flag.

If you are working in unseasonably warm temperatures, turn that A/C on as fast as you can. It will help immensely. Prepare yourself for all the things that happen when temperatures are not ideal. An intriguing endeavor indeed.
Let’s get on with it then… the recipe. Here it is!
Chocolate Sour Cream Pound Cake
3 cups flour
½ tsp salt
½ tsp Baking soda
3 cups sugar
1 cup butter, soft
6 eggs
1 cup sour cream
¾ cup cocoa powder
4 oz semisweet bakers chocolate + 1 tbsp butter
Prepare pans with spray, parchment and spray again.
Preheat oven to 325F.
Melt chocolate and 1 tbsp butter in microwave. Stir til smooth. Set aside but do not allow to harden.
Combine flour, salt, cocoa powder and BS (yes, that is how I abbreviate baking soda) in medium bowl. Set aside.
Cream together sugar and butter til light and fluffy – about 4-5 minutes on medium in the Kitchen Aid. Make sure butter is very soft. Gradually add sugar. Beat for 5 minutes. Add eggs one at a time. Scrape with each addition. Mix until just combined. Slowly mix in dry ingredients until just combined. Make sure to scrape often. Mix in sour cream. Mix in melted chocolate until thoroughly combined.
Distribute batter to pans but do not fill more than ½ way or cake will crown. Weighing is the most accurate method but if a scale is not available, use the “one for you, one for me” method – one scoop to one pan, one scoop to the next pan until the batter is gone. Smooth the tops of the batter. Bake according to pan sizes shown below. If you are using a standard set of 8″ or 9″ pans, bake until a tester comes out clean. Do not check before 20 minutes have elapsed. It won’t be done any sooner than that and precious heat will be lost at a critical point in the cake’s development when you open the door. Be patient and check it at 23 minutes and 3 minute intervals after that. Use your best judgement.
Single batch fills 14” pan – round – 35 to 42 minutes
½ recipe fills 10” pan – 25 to 35 minutes
Let it rest in the pan on a cooling rack for 10 minutes. Turn it out onto rack and re-invert onto rack (bottom side down). Let cool completely before frosting or wrapping for the freezer.
Welcome!
Welcome to The Blue Bird Baking Company! Thank you for coming by and checking us out. We hope you visit often and bring friends.
Our first post will be a little bit about the bakery and how we came to be. So let’s get started!
My name is Mary. I must confess. I have a serious obsession with all things baked. I get it from my Mom, whom I shall refer to as Mom throughout as she has many “adopted” children in the form of our childhood friends. Mom brought us up; that’s myself, my 2 brothers and 3 sisters; with glorious fresh home made bread. All our food was made from scratch and my dad provided us with an abundance of fresh ingredients from our ever expanding garden. Mind you, our childhood was not just about the bread – it also involved fresh biscuits before school with strawberry jam, beautiful cakes for birthdays, and pizza parties for the neighborhood kids. We are spoiled with all the love Mom and Dad put into our food.
Here at The Blue Bird Baking Company we want to share that love – love of good food, great family, wonderful friends and the memories made together. Our name comes from that mentality too – The Blue Bird of Happiness – a symbol of all of life’s joys – prosperity, good health, fortune, success, renewal, togetherness, and home.
Let us help you in celebrating all that you have to be happy about!
